Google Earth Pro Reference
This page is dedicated to Google Earth Pro for communication-focused visualization.
Use this tool for stakeholder-friendly viewing, not for precision engineering analysis.
What This Page Covers
- Overview of the Google Earth Pro interface.
- Must-know basics to get started quickly.
- Must-know basic configuration for this workshop.
- Practical workflows for KML/KMZ review, markup, measurement, and sharing.
- Quality checks before publishing deliverables.
Where Google Earth Pro Fits
Best use cases:
- Quick visual communication of project location and extent.
- Reviewing KML/KMZ deliverables with non-GIS users.
- Simple path and point inspection on a globe background.
Not recommended for:
- Accurate engineering measurements.
- Detailed slope and terrain analysis.
- Production-grade spatial editing.
Overview of the Interface
From the CartONG Google Earth Pro tutorial, these are the high-impact interface areas for daily project communication:
The figure below maps major interface areas to daily training tasks.
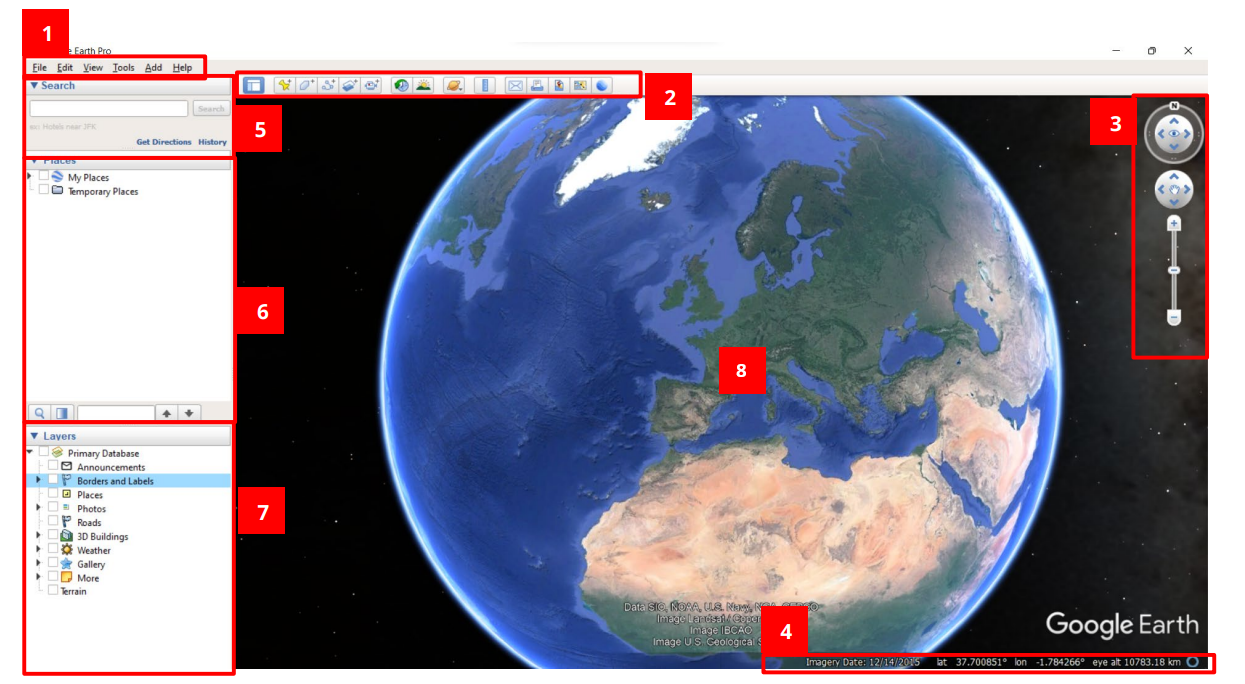
- Menu bar: access file operations, view settings, and tools.
- Toolbar: quick access to common functions like placemarks and paths.
- Navigation controls: pan, zoom, rotate, tilt, and reset view consistently.
- Status bar: check coordinates and terrain/elevation context during review.
- Search panel: quickly fly to a location by place name or coordinates.
- Places panel: store, group, and revisit project placemarks, paths, and folders.
- Layers panel: turn context layers on or off for clean stakeholder views.
- 3D Viewer: inspect AOI and design context in an intuitive globe view.
Navigation Recovery Shortcut
When you are lost in the 3D view, fix both orientation and tilt immediately:
- Press
Rto reset to north-up and no-tilt/top view. Ris faster than pressingNandUseparately.
Must-Know Basics to Get Started
- Open Google Earth Pro and confirm your project folder structure in Places.
- Import KML or KMZ from QGIS and verify it appears in Temporary Places.
- Move reviewed layers into clear folders under My Places.
- Use keyboard
Rto reset to north-up and no-tilt view before screenshots or sharing. - Save reviewed outputs as KMZ packages when sharing with teams.
Must-Know Basic Configuration (Workshop Defaults)
Set these as mandatory defaults before review sessions:
| Setting area | Workshop default | Why it matters |
|---|---|---|
| Show Lat/Long | UTM | Aligns with project measurement and reporting workflows |
| Units of Measurement | Meters, Kilometers | Maintains consistency with engineering communication |
| Navigation behavior | Do not automatically tilt while zooming | Prevents accidental perspective distortion during review |
| Terrain | Keep enabled when slope/elevation context is discussed | Avoids misreading flat vs terrain-informed context |
| Places organization | AOI-based folders with version/date naming | Keeps deliverables auditable and easy to share |
Quick validation before starting:
- Coordinates display is set to UTM.
- Measurement units are set to meters/kilometers.
- Auto-tilt on zoom is disabled.
- Keyboard
Rreset is working for north-up and no-tilt view.
Practical Workflows
flowchart TD
    A[Export KML or KMZ from QGIS] --> B[Open in Google Earth Pro]
    B --> C[Review hierarchy and geometry in Places]
    C --> D[Add stakeholder markup]
    D --> E{Need quick checks?}
    E -->|Yes| F[Measure distance or area]
    E -->|No| G[Prepare deliverable]
    F --> G
    G --> H[Clean temporary layers and names]
    H --> I[Save Place As KMZ]
    I --> J[Reopen for QA]
    J --> K[Share final KMZ]

    classDef input fill:#e3f2fd,stroke:#1565c0,stroke-width:1.5px,color:#0d47a1;
    classDef process fill:#fff8e1,stroke:#ef6c00,stroke-width:1.5px,color:#e65100;
    classDef decision fill:#ffebee,stroke:#c62828,stroke-width:1.5px,color:#8e0000;
    classDef output fill:#e8f5e9,stroke:#2e7d32,stroke-width:1.5px,color:#1b5e20;

    class A input;
    class B,C,D,F,G,H,I,J process;
    class E decision;
    class K output;
Workflow A: Review, Markup, and Package QGIS Exports
- Export final communication layers from QGIS as KML or KMZ.
- Open KML or KMZ in Google Earth Pro.
- Verify names, hierarchy, and visibility ranges of layers.
- Add placemarks, paths, or polygons for stakeholder context.
- Clean temporary layers and validate naming/version tags.
- Save Place As KMZ.
- Reopen once for QA, then share.
Output: reviewed KMZ package with stakeholder-ready layer organization.
Workflow B: Measurement Checks (Distance, Area, Elevation Profile)
- Open Tools > Ruler.
- Select the measurement mode (line/path/polygon) based on need.
- Confirm units are meters or kilometers.
- Measure required distances/areas for quick communication checks.
- Save measurements into Places for traceability.
- For path-based checks, use elevation profile only for quick communication-level context.
- For detailed engineering profile decisions, use QGIS profile workflow with the correct DEM source (Copernicus 30m for preliminary or survey-derived DEM for detailed analysis).
Output: saved communication-level measurement artifacts; detailed profile validation remains in QGIS workflows.
Data Exchange Notes
- Prefer EPSG:4326-based outputs for KML workflows.
- Keep symbols simple because advanced cartographic styling may not transfer.
- Use KMZ when you need compact sharing or bundled resources.
Must-Know Tool Paths
- Import KML/KMZ: File > Open.
- Save folder/package: Right-click folder > Save Place As.
- Create placemark: Add > Placemark.
- Create path/polygon: Add > Path or Add > Polygon.
- Ruler: Tools > Ruler.
- Elevation profile for path: Edit > Show Elevation Profile.
- Options/Preferences: Tools > Options (or Google Earth > Preferences on macOS).
- Quick north-up and no-tilt reset: keyboard
R.
Quality Checklist Before Sharing
- File opens without missing resources.
- Layer names are human-readable.
- AOI and key features are clearly visible at practical zoom levels.
- Version/date is included in file name.
Rreset check is performed before final screenshots or demonstrations.
References and Image Sources
- CartONG Tutorial: Mapping Basics within Google Earth Pro (2022, EN)
- Google Earth Help: Create and Manage Placemarks
- Google Earth Help: Measure Distance and Elevation